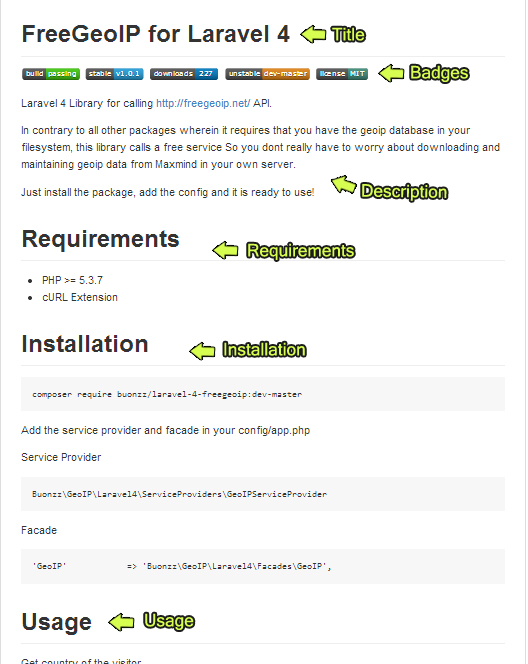
If you are sharing code in GitHub, the README.md file is the first thing that the viewer will gonna see in your repo. So it is very important that it is professional looking and easy to understand. Today, we'll go over some tips and tricks on how to come up with a better README file.
Anatomy of a README.md file
In the image above, you'll see there are some major parts of a README file
- Title
- Badges
- Description
- Requirements
- Installation
- Usage
- Credits (Optional)
Title
This is usually the human-readable version of the repository name. Like for example, if you have https://github.com/buonzz/laravel-4-freegeoip repository, the value of the title would be "FreeGeoIP for Laravel 4".
Badges
Those are the little images that you see in the repo's page. Here are the commonly used ones:
Travis CI Build status - this is the status of the codes (failed/passing) in travis-ci.org. Continous-Integration is the process of automatic testing of the codes, whether it is running properly in many platforms (multiple PHP versions, HHVM etc) and triggering the PHPUnit/Behat or any other Tests. You can read more about CI in here. Simply put, this is usually an indicator if the repo is safe to use in your own project or not. A passing (green) green indicates it had passed all the tests and good to use.
Stable version name - the latest stable release in packagist.org. This also corresponds to the Releases on the Github repo, which is what packagist.org is using to determine the latest version.
Number of installs via packagist.org - everytime you require this package in composer.json and its downloaded from packagist, this is incremented by one. This indicates how many developers had downloaded this and used in their project.
un-stable version name - the development version of the package, contains the latest un-tested version.
license - the license which governs this repository codes
Except for the Travis CI badge, you can grab the rest of those in https://poser.pugx.org/ . For Travis results though, you need to enable the build process in travis-ci.org site for the repo, then grab the badge in the results page there. You can read more about Travis CI on here and here.
Description
This contains the basic explanation of what your repository is all about. This is a good place to put links to the documentation page and any other overview info about your repository.
Requirements
This is usually a list of dependencies that is needed in able to run your library. For example Laravel 4.2 requires PHP 5.4 and Mcrypt to run properly, those list of requirements is best placed in this section.
Installation
This contains the step by step instruction on how to install your library. For Laravel packages, this usually involves the instructions on adding the ServiceProviders in the config file, changing the database settings, publishing the assets etc.
Usage
This section shows sample codes on how to use the package, usually in a form of "Hello World" sample, so that it's easier for a developer to use it in his own project.
Credits
if the project is sponsored by some company, forked from another repo, relying on another external service. This is a good place to put the links to those or mention their names. This can be optional and not necessarily required if you have nothing to mention at all.
Knowing the parts is half of the story though, writing it is not straightforward since README files in GitHub is not using HTML for generating that format.
The README file has a filename extension "md" which means markdown. Markdown is a markup language which performs text-to-HTML conversion for web writers. Markdown allows you to write using an easy-to-read, easy-to-write plain text format, then convert it to structurally valid XHTML (or HTML). You can read more about the markdown syntax in here.
However, Github md files is special, since there is a so-called GFM (GitHub Flavored Markdown), which is a customized version of original markdown language. You can read more about GFM in here.
The fastest way to learn it is by looking at the examples and learn some basic syntax of GFM. Below is the GFM markup the had generated the image above in the anatomy. Take a couple of hours of learning GFM while viewing the sample below. I assure you, you will be creating an awesome README file in no time.
Did you find this useful?
I'm always happy to help! You can show your support and appreciation by Buying me a coffee (I love coffee!).
