GPS personal tracker is great to have for variety of reasons, in my case, there are several use-cases I need it:
- During long travels, I often lose track of the roads and routes the vehicle I'm riding went into (when you fell asleep for example ), I would like to log those routes in a simple text file, so I can review it later in a map. This information can be used when let's say you have to go to the same place later and you are driving yourself the car.
- It's a safety mechanism in case I lost my 3-year old in a crowd when we go outside. A GPS tracker installed in his bag ensures I can find him no matter what.
- Track movement, vibrations and geo-fence of my Car and Bike (yeah, the GPS device will send you a text message when any of those is triggered)
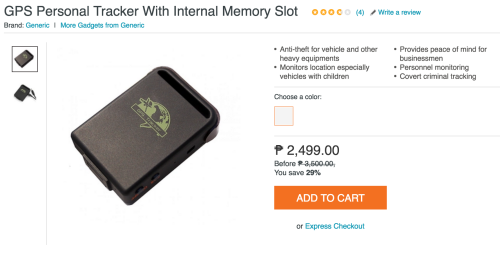
I ordered the product in Lazada website on May 8th. The estimated delivery date ( COD ) is around May 16-18. The item is fulfilled by this site called https://www.latestgadget.com.ph/ . The cost was about PHP 2,499 (around $54). It is not cheap, its not so expensive either.
One weird thing about Lazada's website is, their Order tracking page doesn't gives the tracking number of the courier. I have to check it in my email and the tracking code is there.
I saw in my email the tracking code around May 10. The courier is Air21. Sigh!, they are terrible one compared to LBC, they don't have a decent office in our town and their delivery agents usually is having hard time finding someone-else home, the last product they is shipped by Air 21 ended up shipped back to Manila, because they cannot find my home.
I have to actually go to the distribution center itself to pick up the package and pay it there. To make sure it wont be going anywhere this time.
Unboxing
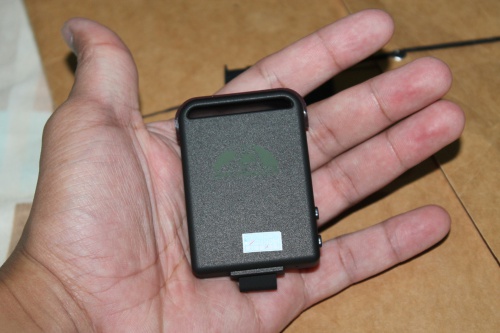
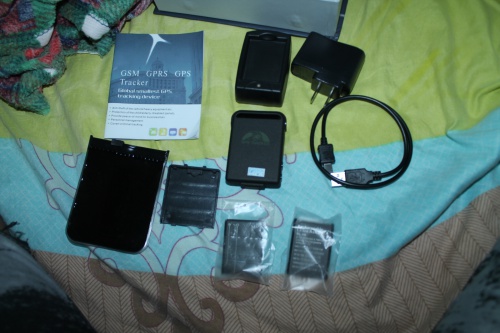 The first impression you will have upon seeing the GPS tracker itself -- it is small. Which makes sense, since like for example if you want to do some covert operation and slip this tracker into someone else's bag, It is really easy since it is very light and not bulky.
 Mine came with 2 set of batteries, as well as two back covers (not sure why, is those parts always getting misplaced by previous customers?) It also have this manual which contains all the commands needed in able to interact with this device.
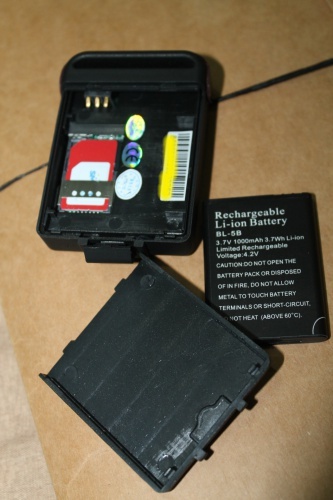
The device looks like a super basic phone that has no screen on it, just 2 buttons, 1 LED display, small mic opening, mini USB port and the rest looks like a typical candy-bar setup. MicroSD and SIM card is a bit difficult to install, since MicroSD is tucked right below the SIM card. So in case you need to get the MicroSD, you'll need to open the case, remove the battery, remove the SIM card and finally get the MicroSD (brilliant setup).
 For the SIM card, I'm using Smart (http://smart.com.ph/) since it is the spare one that I've got. Ideally, You might need to have both numbers share the same Telco provider to prevent expensive SMS rates. It worked pretty well in my case, I'm able to call the unit and receive locations to my phone.
One notable thing about the device is the curved handle-like thing over the top - it is actually the GSM/GPRS antenna. It comes with this little plastic cover that is both magnet and water proof. Probably for those cases that you need it to placed in wet areas.
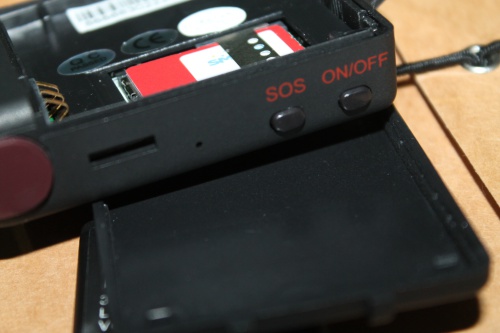 The two buttons that you see in here is the "SOS" button and the on/off switch,though as soon as you slip in the battery, it will turn on automatically (green blinking LED), so I don't see the purpose of the on/off switch.
Aside from that, everything else needs to be controlled via SMS commands. So it is very important that both your SIM card inside the device and the phone you are going to use to perform the initial setup has both credit.
The two buttons that you see in here is the "SOS" button and the on/off switch,though as soon as you slip in the battery, it will turn on automatically (green blinking LED), so I don't see the purpose of the on/off switch.
Aside from that, everything else needs to be controlled via SMS commands. So it is very important that both your SIM card inside the device and the phone you are going to use to perform the initial setup has both credit.
The USB connector for the accessing the data inside the device is the same cable the charger uses. It is has its own mini-casing for the charger, but you can also charge the battery itself while it is inserted still in the device. This is convinient when for example you have to charge the other battery while using the other one.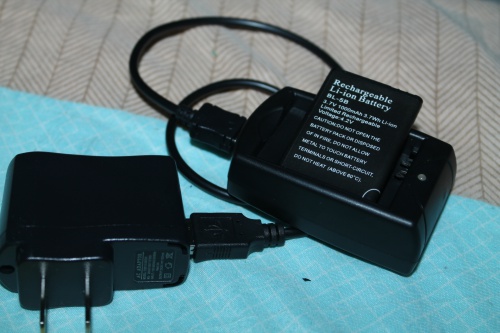
Initial Setup
Since all commands is based on SMS, you need to have your phone ready to perform the initial setup. You might use around 30-50 credits in able to perform the initial setup of the device.
Once you powered on the device, the green LED should blink a few times and then keep blinking in slower pace at later time (every 3 seconds).
First, initialize the device by sending it
begin123456the 123456 here is the default password, and the begin keyword simply means to initialize the settings of the device., it should reply to you with "begin ok"
It is good idea to change the default password to something else, so lets do that
password123456 XXXXXXthe XXXXXX should be your new password (all numbers). You should keep this secret as possible by deleting the text message in your phone.
The next thing to do is to set an authorized phone number. This is the admin number for the GPS, so make sure the first number you register is strictly being used by you. Some features might not work if you did not set the admin number, and it will also very insecure, since everyone who can call the SIM card of the GPS device will get the location of it (very bad if some stranger get a hold of your number).
To set the authorized phone number, dial the SIM card of the GPS device, let it ring for a few seconds, then end the call. Repeat this up to 10 times. Your number will be added to the device after the 10th call, which you can confirm when it responded with an "Add master ok" text message.
You are now set! whenever you want to locate the GPS device, just give it a call, it will hang up, then a few moments later, it will text you with a message containing it's location information. Along with the text message is a link to google maps so you can visually see in the map the exact location.
Viewing the Map location when there is no Internet
even though the text message sent by GPS tracker contains the URL to google maps, what if you have no Internet? This is easy, if you just installed Maps.ME or something similar offline maps, when you clicked the Google Maps link in Android, it will ask if you want to open this using that offline map. If you have no internet and you have the map downloaded in your end prior, you can just select the offline map app and you will se the location.
Registering your device to the portal
There is an online portal for this device called TrackerHome, it's url is on http://www.gpstrackerxy.com/. I'm not sure as well what is up with the less obvious and generic domain name/app name, but looking at the layout of the site, it seems like built by some developer from 90's.
With online portal, you can view the location of the GPS in a web browser in real-time. This though requires that the GPRS is enabled in your SIM card and it is able to connect to Internet.
Go and select the Server 3 on the homepage, in the next page, click the Register button. It should display some pop-up with registration box on it (again, another old-school style). Username and password fields is pretty obvious, but the IMEI is not. To get the IMEI of your device, send this message to your GPS tracker
imeiXXXXXXthat is, the keyword imei followed by your six-digit password you have set earlier. It will respond to you with the IMEI code. Go on and complete the registration process.
Once registered, go head into login page and login with your username/password. Go to System Settings > Terminal Management Click "Add" in the top to add you device. Make sure you fill up the IMEI and other field so it's easier to see it later.
Now, configure APN in your device. In my case, it is available on their website This is unique for every GSM provider so you might need to google your own. For my provider, it is "smart1", so I did sent this to my device
APNXXXXXX smart1It should respond with APN ok.
Next is set the Server you had chosen in http://www.gpstrackerxy.com/ . If let's say you clicked Server 3, the IP should be 104.250.138.146 and port 9000. In able to set this to your GPS device, send the following:
adminipXXXXXX 104.250.138.146 9000
It should respond with adminip ok After that, you need to enable GPRS, to do that, send
GPRSXXXXXXNote that when in GPRS mode, calling the phone number will not respond to you with SMS. GPRS mode and SMS mode is mutually exclusive. Generally, you only want to swtich to GPRS mode if you want to view the real-time location via portal. You normally wont like to leave this on for long since it's incurring charge for using Internet!. To go back to SMS mode, just send SMSXXXXXX
If all is working well, you should be able to see your device online in the portal and it should be able to display its current location in the map.![]()
Configuring it as a Data Logger
As mentioned earlier, instead of querying the device from time to time with its current location. Why not just have it logged its position every nth second and write those into MicroSD. Then later on, you view the route it had taken for whatever purpuse it may serve.
To do this, send the following code to your device:
save005s***nXXXXXXthis will save the current coordinates to MicroSD every 5 seconds. You can customize this replacing 5 with any interval (in seconds) you would like. The 3 asterisks can be replaced with any number, which basically means how many times it should log (asterisks means it just keep logging with no limit)
When you want to have the device stop logging, just send
nosaveXXXXXXTo view this route into a map, you need to get the USB cable and plug it into your cable device and into your computer. It will mount 2 volumes and the other volume should contain some text files with .txt extension, those are the log data. Usually, the filename is ddmmyy.txt format. Go into the portal and select Reports > Data Import and select the .txt file. It will now load that map data into a google maps, wherein you can see the routes the GPS had taken
Play with other features!
There are many other features available on the device, read the manual provided and play with it as much as you can!
Did you find this useful?
I'm always happy to help! You can show your support and appreciation by Buying me a coffee (I love coffee!).