Alright, so now you have an OpenStack installed and running. Now what? Of course the first thing you want to do is create a Virtual Machine Instance you can play with. But hold your ponies little boy, you might want to read on first, as you might not be able to connect to any of your VMs if you did not read carefully!
Common Mistake! It is a common behavior of a new OpenStack user upon logging into dashboard to create a new instance via the menu w/o setting up a new Key Pair first. If you didn't attach a key pair in your VM instance, you will not be able to connect to it!
So the first thing you might want to do is create a new Key Pair. This is basically a PEM file that you are going to use in able to authenticate to the server instead of shoving your usename/password in the SSH console.
Wtf is PEM? PEM is a file format that may consist of a certificate (aka. public key), a private key or indeed both concatenated together. Don't pay so much attention to the file extension; it means Privacy Enhanced Mail, a use it didn't see much use for but the file format stuck around
You can create this by going to "Project > Compute > Access and Security" menu
Click the "Create Key Pair" on the top right
Note: you can also import an existing key-pair, but I'm assuming you don't have one yet on this tutorial.
This will launch a dialog like this
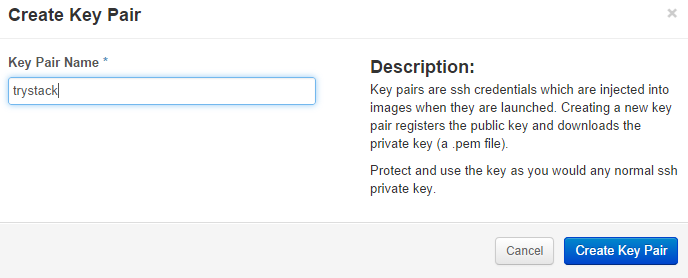
Enter your desired Key-Pair name and hit the "Create Key Pair" button. It will spit out a trystack.pem file to your browser which you can save in your computer.
Im' assuming you are in a Windows machine and you are using PuTTY as SSH client from this point forward
Now, the question is, how can I use this pem file thing in PuTTY?
Well, the answer is no, so you should convert it first, into a ppk format.
To do this, head on to download page of puttygen.exe then fire it up by double-clicking it.
You'll see a window like this:

Click the "Load" button and select the pem files you just had downloaded earlier ( you might need to select All Files (*.*) in able to see the pem file)
If should now read the file and say this

Click OK then click the "Save private key" on the dialog.
You might be prompted to provide a passphrase for the ppk file, you can provide one but it is not required. When you want to make sure you are the only one who is capable of using that ppk file (for example the ppk file was stolen from you), providing a passphrase will ensure they won't be able to use it unless they know the passphrase as well.
Save the ppk file somewhere else in your hard drive and close the puttygen.exe window.
You can then now create the VM instance for you to attach the Key Pair, click the Instances menu on the left side

Then click "Create Instance" button on the top right. Enter the necessary details like Availability Zone, Instance Name etc in the Details tab, then select the Key Pair you just had created in the Access and Security tab.

You should also fill up the Networking tab for your instance to be reachable outside. The networking part is something you should work out with your Cloud provider as this is usually being configured by them for you upon giving your account.
Click the "Launch" button and if everything went fine, you will be able to see your VM running in the Instances menu. Click the "More" button in the "Actions" column to associate your VM to a "floating IP".

Floating IPs are just publicly routable IPs that you typically buy from an ISP. We can allocate them to our instances, thus making them reachable from the outside world.
The "Manage Floating IP Associations" dialog will appear, which lets you assign IP for this VM to use. Please note the IP you had created, as you are going to use that in connecting your VM.
Now, open the putty.exe and input the floating IP of the VM

Hostname should be the Floating IP assigned to that instance. Floating IP are IP that is accessible outside, it can be re-assigned to any VM in your OpenStack either when the VM was created or when edited.
Select “data” on the left hand side under “auto-login username” enter the user “root”

Select “Auth” on the left hand side then under “private key for authentication” select the .ppk file we just created with PuTTYGen

Now hit the Open button to connect to the SSH. You should now be logged in to the VM instance as root user.
If the SSH client cant connect, most likely, the SSH port is not open or your IP is not allowed to connect to SSH port. To verify this, go to Access and Security menu, click the "Manage Rules" button next to the security group on which your VM is assigned into (usually, it is called "Default"). Then check if you are able to see an entry like this:
![]()
The rule basically allows all IP to be able to connect to the port 22, which is SSH port. This might be different in your case, as organizations usually has only a specific range/list of IP that is allowed to connect into via SSH, so check with your System Administrators if you are still having problems connecting.
Did you find this useful?
I'm always happy to help! You can show your support and appreciation by Buying me a coffee (I love coffee!).